This is an update on the scripts that are running the game.
PlayerAttack.js: http://pastebin.com/i1cViLAJ //deals damage by raycasting
ZombieScript.js: http://pastebin.com/9iQYuny0 //handles forward motion and damage
ZombieSpawnerScript.js: http://pastebin.com/KXCwt1EC //handles spawning zombies
ZombieSmoothLook.js: http://pastebin.com/bKESWKVx //handles the wandering and smooth turns
Download Build 2.5:
https://docs.google.com/file/d/0B5TMIP6TlZSkYUZCZzFJbjZjTXc/edit
Thursday, January 31, 2013
Wednesday, January 30, 2013
Seth's update


Ive been modeling the little girl using a low poly method. The girl is going to be the protagonists younger sister that your trying to rescue from the Piñata Zombies.


Josh Turner Update
Due to working on more tutorials, i have not been able to finish the remake of the House for the street level, i will try to complete and post it on Friday. Once the house is done, i will be working more on the Lunch Room, adding more detail to it and trying to finish it up by the end of next week, depending on the tutorials i need to finish/work on. Once thats complete, the Candy Factory will be next!
Travis' Update
This past week I worked with Mark on writing some basic ideas for the scripts in the technical documentation of the game; we mostly just wanted to get the specifics about how the game's basic aspects will function. You can see more detailed information in Mark's post.
Now I will be working on texturing for the game. Specifically, I am going to try to find a tutorial on creating a scorch mark texture to use in the game after a tootsie bomb explodes. Hopefully that won't take too long, and then I'll just work on texturing whatever needs to be textured.
Now I will be working on texturing for the game. Specifically, I am going to try to find a tutorial on creating a scorch mark texture to use in the game after a tootsie bomb explodes. Hopefully that won't take too long, and then I'll just work on texturing whatever needs to be textured.
Kristen Texture Update


 |
| Why so serious? Took me a while to make everything look right but I'm liking how its turning out. I am using a lot of layers with transperancy and different effects. I am constantly chaning the colors and I am using the overlay layers the most with creating the battle scars and grime with different brushes and techniques. |
Mark's update 1/30
This week Travis and I worked on technical documentation for the scripts in the game. Our game is basically composed of a few objects: The player, the zombies, the tootsie bombs, the zombie spawner, doors, checkpoints, and triggers. In its most basic form, it will need all of these things.
Scripts:
Main character: Uses Unity’s default Player script.
Melee system:
Piñata stick is shown in the right hand corner. A small piece of hand is shown at the bottom.
attack timer = setTime. decreases to zero. setTime for left click is x. setTime for right click is 2x.
if Left click && attack timer is 0, then swing animation plays
if distance from zombie < setDistance && if rotation is facing zombie, zombie health - damage;
if right click && attack timer is 0, harder swing animation plays
if distance from zombie < setDistance && if rotation is facing zombie, zombie health - increasedDamage;
Jumping: Unity’s built in jump script. Height tbd
Movement: Unity’s built in character script. Speed tbd
Health: GUI bar at top of screen shows % of max health. width of the bar = maxWidth * % health
Healing: if q key is pressed && numCandies >= candyBarConversion, then:
numCandies -= candyBarConversion
health += setHealthAmount
health bar is updated.
Tootsie bomb:
if R key is pressed and held, crosshair appears on screen, player can still aim (see character script)
if R is released, play friend pinata animation,
new instance of tootsie bomb is created with orientation of player’s camera, with initial forward force of x. countdown timer begins.
if countdown timer == 0, then explosion animation plays,
if zombie is in blast radius, y, then zombie health -= damageOfBomb * (1-%distanceOfMaxRadius);
create scorch plane at coords of bomb
Zombie Piñata:
zombie LookAt(player), apply forward force of speedVar;
speedVar can be initialized randomly (within set boundaries)
if distance < setDistance && attackTimer <= 0, then attack animation plays, player health -= zombieAttack
set a health var
if attacked, apply force back away from character, health -= attack
if health <= 0, play dying animation. create confetti object (animated clip). spawn random number of candies (1 to 5) at dead pinata position (+ or - random number so they don’t all spawn at the same spot). after animation, remove dead pinata.
Dialogue Object: When the player crosses this invisible object, the next dialogue recording begins to play.
Zombie Spawner Object: This object is the spawn point for the zombies. These will either run on a timer (especially for the wave sections) and a timer with a spawn limit for the rest of the areas.
if timer < 0 && max spawn num is not reached, spawn zombie.
Door Script
if player’s distance < doorDistanceVar && door is closed && key E is pressed, open door.
I've also been working on the player's attack script. I've decided that I need to use a raycast from the player's camera to whatever they're pointing at. If the raycast hits a zombie and the distance of the raycast is less than a certain distance, damage will be dealt to the zombie. This has been completed, and after the health gets down to zero, the zombie disappears.
I also played around with the zombie look script. Before, the zombies looked directly at you at every moment during the program. Now, there is some damping on the look, so it takes them a few moments to turn to face you.
Tuesday, January 29, 2013
Light Map Baking - Travis
This past week I've been working on tutorials for baking light maps to textures in Maya. We will be using this technique in our game for the lighting, because bakign light maps will not slow down the game a lot like dynamic lighting. Below are some images of a simple scene that I made and baked a light map to. You can see more detailed images of the UV maps at the post on my personal blog, here.


Monday, January 28, 2013
Josh Turner Scene Modeling
Josh here, my job in the Iron Sombrero team is to do the area modeling for all the levels. its my job to model all of the objects in each of the levels and trying to make it all flow together and look as real as possible.


With designing the suburb house, it was all easy and a pretty quick modeling and putting it together. However at the end of it, when we tried to add new edges it would delete part of the faces on the house. We were not able to figure out how to fix this, so i made a new house base, which in time turned out to be a waste of time, so now a new house is going to be made, should be quick since the old house can be a reference, so later in the process line, textures will be a lot easier.


This is the Lunch Room for the School level, where there are waves of zombies that you have to fight off. With modeling this, there haven't been any difficulties so far, its not complete as far as modeling so hopefully everything goes great. We based the design off of our own Lunch room. And in my opinion its going great so far.
Texture Test - Kristen


Wednesday, January 23, 2013
Mark's update
Yesterday I created a spawner prefab object inside of Unity. These objects can be placed in the scene and zombie instances are spawned at that location based on a timer that we can change for each individual spawn area. I also coded a max spawn limit that restricts the maximum number of zombies that can be spawned from the spawn point.
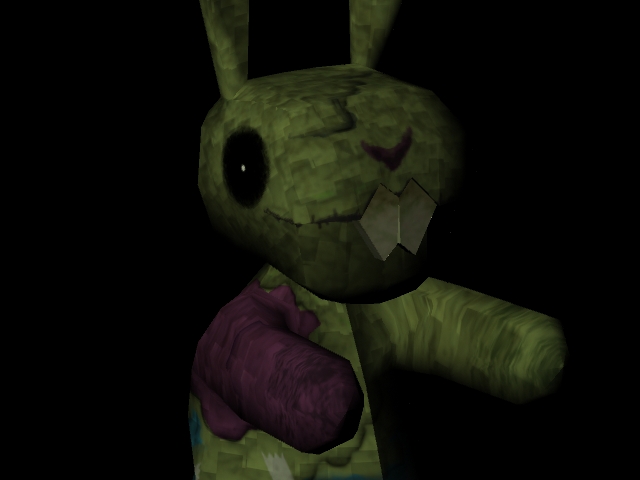
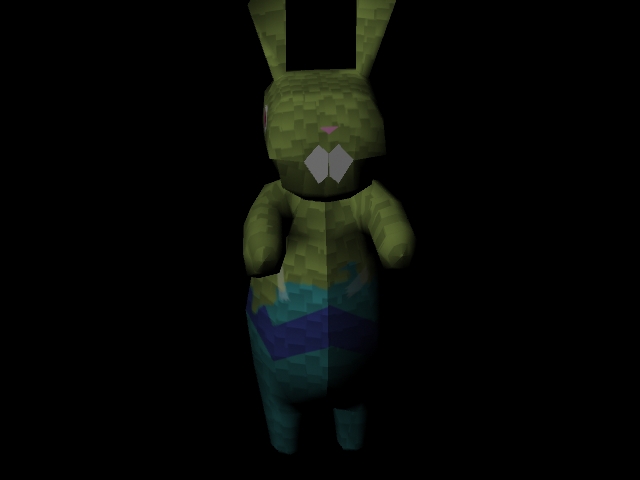
I've also been working on UV mapping, but I still have a lot to do. I've been caught up with the scripting stuff.
UVs for the bunny piñata

https://sites.google.com/site/teamironsombrero/home/gamebuild
Go here to download the build of the game.
I've also been working on UV mapping, but I still have a lot to do. I've been caught up with the scripting stuff.
UVs for the bunny piñata

https://sites.google.com/site/teamironsombrero/home/gamebuild
Go here to download the build of the game.
Thursday, January 17, 2013
.JPG)


Friday, January 11, 2013
Concept Art
 |
| An example of a few different kinds of piñatas.
From left to right:
Cow holding a piñata stick. Standard piñata. Raccoon piñata holding a soda cup. Bunny. Turtle. Bunny pushing a lawn mower, minding his own business.
Their stubby legs produce a comical walk cycle. Most of the piñatas are fairly slow, but their speed will vary. The bunny will have a higher speed (and maybe could have a hop attack?). All the piñatas show damage: You can see the tape holding them together.
|
Thursday, January 10, 2013
Meet Team Iron Sombrero

Welcome to the Team Iron Sombrero Blog!
The Idea: A Piñata Zombie Apocalypse in suburban America. You play as a small child at his birthday party. Suddenly, everything goes terribly wrong, and you begin an adventure to save your sister from the enraged piñata hordes. With enough quirk and pizzazz to light an oven, this game guides the player on a path of wacky, twisted horror.
Stay tuned!
For more detail on the intricacies of the story and design, see the game design document.
Game Design Document:
Subscribe to:
Comments (Atom)